


The idea of this post is centralized and guide you through for all the first steps required for we getting started with operators as fill the gaps and make it easier as possible. It will start from what, when and how to use until you create an operator using the client tool operator-sdk and deploy it on Minishift/OpenShift installed locally.
Understanding operators
Watch in sequence the following movies.
Minishift Install/Setup
Minishift is the easy way for you to have an OpenShift installing running locally in your machine. Following the steps required by default for in MacOSX. You can check the steps for another SO in its documentation. See here.
Setting Up the Virtualization Environment ( MacOsX with xhyve Driver )
IMPORTANT: If you have a virtual box application installed locally you will face issues when trying to use this driver. In this way, you need to remove the Virtual Box by its uninstall tool or choose another driver.
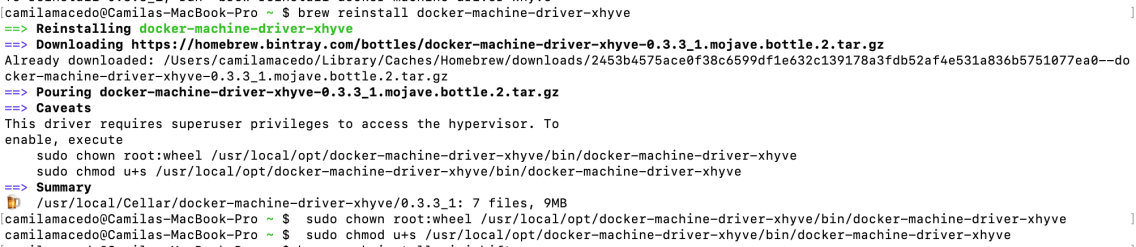
Following the commands
- Install the driver via brew
$ brew install docker-machine-driver-xhyve
- Run locally both chwon commands that will be output in this installation
Installing Minishift
$ brew cask install minishift
OR use the following command to update it
$ brew cask install --force minishift
NOTE: if be required delete the Minishift then execute `$ minishift delete`
Setup oc tools
$ minishift oc-env
export PATH="/home/john/.minishift/cache/oc/v1.5.0:$PATH"
# Run this command to configure your shell:
$ eval $(minishift oc-env)
Enable Operators in Minishift
# create a new profile to test the operator
$ minishift profile set operator
# enable the admin-user add-on
$ minishift addon enable admin-user

# OPTIONAL, configure the VM
$ minishift config set cpus 4
$ minishift config set memory 8GB
$ minishift config set vm-driver virtualbox
# start the instance
$ minishift start
# Allow use public docker images for example.
$ minishift config set insecure-registry 172.30.0.0/16

# IMPORTANT: To deploy operators is required to be logged with the system:admin  $ oc login -u system:admin
Check if you are able to use the console. See the URL to do it and the details in the output of this command as the following example.
Server Information ...
OpenShift server started.
The server is accessible via web console at:

    https://192.168.64.6:8443/console

You are logged in as:
    User:     developer
    Password: <any value>

To login as administrator:
    oc login -u system:admin
Operators Install/Setup
Pre-requirements
Ensure that you have all the following requirements installed locally. If not, please install them.
Install the Operator SDK CLI
$ mkdir -p $GOPATH/src/github.com/operator-framework
$ cd $GOPATH/src/github.com/operator-framework
$ git clone https://github.com/operator-framework/operator-sdk
$ cd operator-sdk
$ git checkout master
$ make dep
$ make install
Reference: Install the Operator SDK CLI section from its README.
Check the installation
Execute the command: `$ operator-sdk –version`
Creating a Memcached Operator
This content will try to fill the holes which you may find in the documentation in order to achieve it. The following steps are based on the example found as Getting Started in Operator-SDK , and Operator OpenShift documentation as in the Operator-Framework README.
Creating the project
In your $GOPATH is required to create the directory where the project of the operator will be. Ensure that you have the following directory.
$ cd $GOPATH/src/github.com/example-inc/
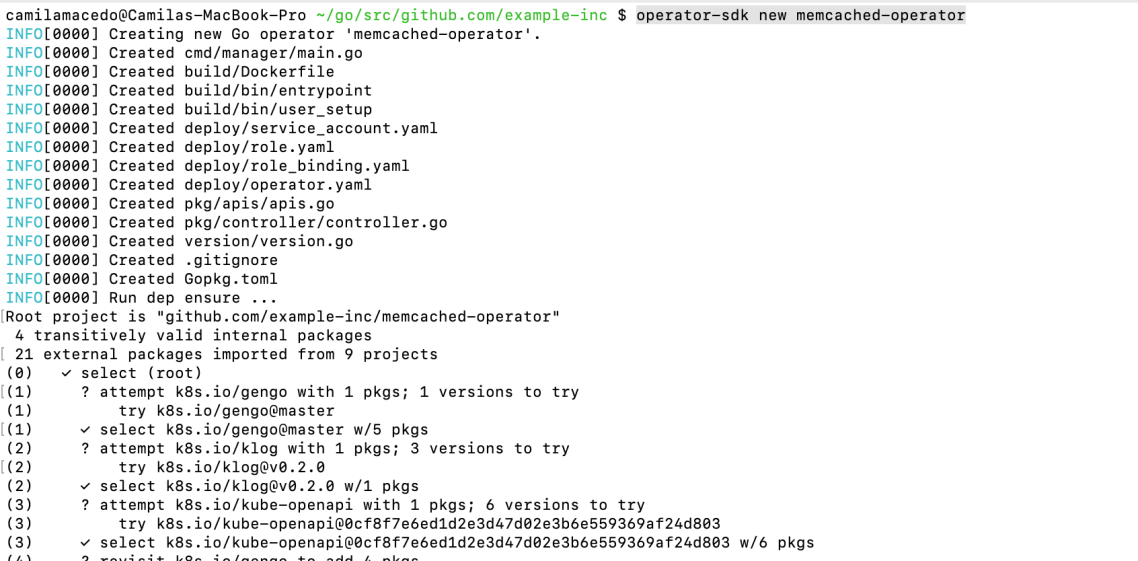
Use the CLI to create a new memcached-operator project:
$ operator-sdk new memcached-operator
$ cd memcached-operator
NOTES:
- See that the Operator-SDK generated a go project in this directory.
- The default type is Go, however, you can use the operator-SDK has other types which are Helm and Ansible. You can define the type used by the parameter
--type. E.g.operator-sdk new memcached-operator --cluster-scoped --type helm
If you would like to create the operator to be available and running in the cluster level use the following command instead.
$ operator-sdk new memcached-operator --cluster-scoped
For understanding what it means and its configuration see here.
Understanding the project created by the SDK
- Check that in the project was created the
cmd/manager/main.gofile and see here its reference for a further understanding. - Check here the specification of the Kubernets Go pkg.
- Check the description of each dir here
NOTE: Check the layout description for the Helm based projects here
Add a new Custom Resource Definition
Using SDK cli-tool to create the files by the following command.
$ operator-sdk add api --api-version=cache.example.com/v1alpha1 --kind=Memcached

- The APIVersion which will be created is:
cache.example.com/v1alpha1as it was defined by the parameter –api-version- The Kind will be
Memcachedas it was defined in by the parameter –kind- This will scaffold the Memcached resource API under
pkg/apis/cache/v1alpha1/...
Defining the Custom Resource
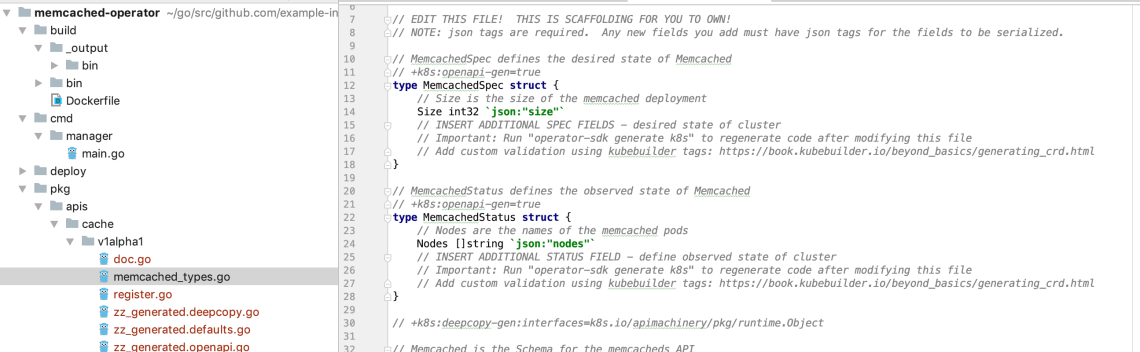
- Go to the file “pkg/apis/cache/v1alpha1/memcached_types.go”
- In this file, you will define the resources required for your operator
- For the Memcached, we will just specify the size for the specs and the nodes to be checked in the status as follows.
type MemcachedSpec struct {
	// Size is the size of the memcached deployment
	Size int32 `json:"size"`
}
type MemcachedStatus struct {
	// Nodes are the names of the memcached pods
	Nodes []string `json:"nodes"`
}
NOTE: It could have more specs and status to be monitor/checked by Kubernets/Openshift APIs as the following example.
type AppSpec struct {
   Size int32 `json:"size"`
   Version string `json:"version"`
   ConfigMapName string `json:”configMapName"`
   TLS *TLSPolicy `json:"TLS,omitempty"`
   SecretName string `json:"secretName"`
}
type AppStatus struct {
   Pods string `json:"pods"`
   Standby []string `json:"standby"`
   ExternalAddresses map[string]string `json:"externalAddresses"`
}
TIP: Following some links for you are able to check the *_type.go file implemented in some projects as some example and reference.
- https://github.com/odra/apicurio-operator/blob/operator-updates/pkg/apis/integreatly/v1alpha1/apicurio_types.go
- https://github.com/jaegertracing/jaeger-operator/blob/master/pkg/apis/io/v1alpha1/jaeger_types.go
- https://github.com/integr8ly/keycloak-operator/blob/master/pkg/apis/aerogear/v1alpha1/types.go
Using the SDK to generate the funcs based on the CRD
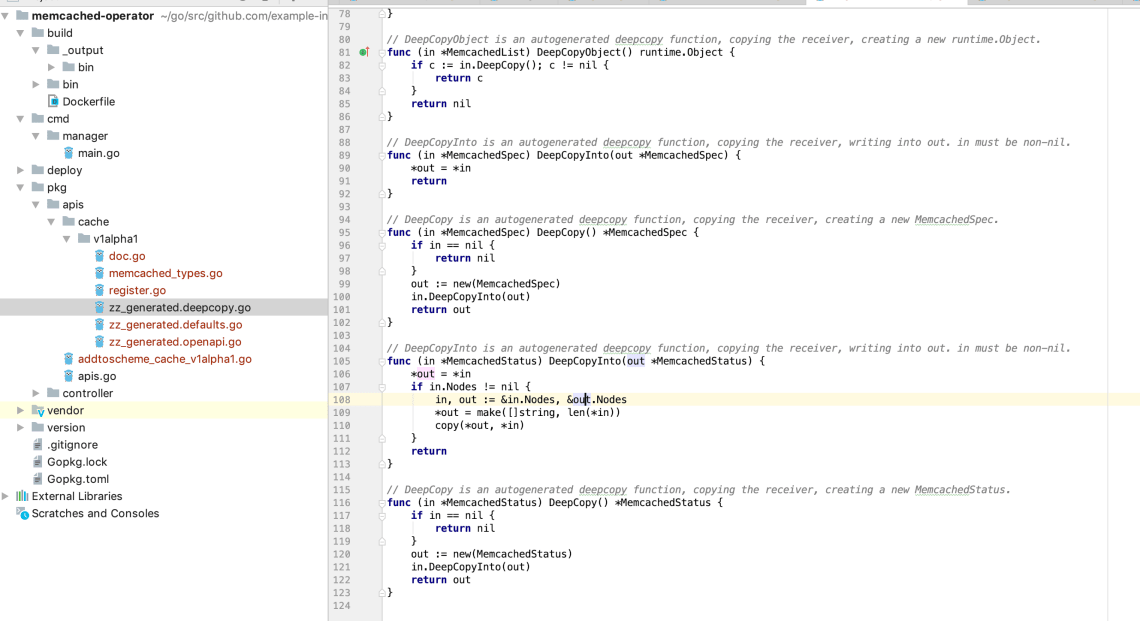
- After modifying the
*_types.gofile, always run the following command to update the generated code for that resource type:
$ operator-sdk generate k8s
- See the output:
INFO[0001] Running deepcopy code-generation for Custom Resource group versions: [cache:[v1alpha1], ]
INFO[0004] Code-generation complete.
- Check that the deepcopy code was generated in your operator project.
Add a new Controller
- Run the following command to add a new Controller to the project to watch and reconcile the Memcached resource:
$ operator-sdk add controller --api-version=cache.example.com/v1alpha1 --kind=Memcached
- The controller files will be created under
pkg/controller/memcached/. - See the output:

- Go to the file “pkg/controller/memcached/memcached_controller.go” and see its implementation
- Here you will do the implementation to “controller” the instances which will be created in your cluster/nodes. The idea is that the Controller will watch the resources and trigger actions when required.
- For this test, replace the file with the example of an implementation which you can find here
What is implemented in this example?
The example controller executes the following reconciliation logic for each Memcached CR:
- Create a Memcached Deployment if it does not exist.
- Ensure that the Deployment size is the same as specified by the
MemcachedCR spec. - Update the
MemcachedCR status with the names of the Memcached Pods.
Todo the above behaviours are required to check/watch Memcached pods deployed in your cluster/nodes as its resources. Remember that the Manager will manage and trigger the actions implemented in the API of this operator.
The following implementation will listen/watch any event to Add, Update or Delete a Memcached object.
// Watch for changes to primary resource Memcached
err = c.Watch(&source.Kind{Type: &cachev1alpha1.Memcached{}}, &handler.EnqueueRequestForObject{})
err = c.Watch(&source.Kind{Type: &appsv1.Deployment{}}, &handler.EnqueueRequestForOwner{
   IsController: true,
   OwnerType:    &cachev1alpha1.Memcached{},
})
// add adds a new Controller to mgr with r as the reconcile.Reconciler
func add(mgr manager.Manager, r reconcile.Reconciler) error {
   // Create a new controller
   c, err := controller.New("memcached-controller", mgr, controller.Options{Reconciler: r})
   if err != nil {
      return err
   }

   // Watch for changes to primary resource Memcached
   err = c.Watch(&source.Kind{Type: &cachev1alpha1.Memcached{}}, &handler.EnqueueRequestForObject{})
   if err != nil {
      return err
   }

   // TODO(user): Modify this to be the types you create that are owned by the primary resource
   // Watch for changes to secondary resource Pods and requeue the owner Memcached
   err = c.Watch(&source.Kind{Type: &appsv1.Deployment{}}, &handler.EnqueueRequestForOwner{
      IsController: true,
      OwnerType:    &cachev1alpha1.Memcached{},
   })
   if err != nil {
      return err
   }

   return nil
}
Every Controller has a Reconciler object with a Reconcile() method that implements the reconcile loop. The reconcile loop is passed the Request argument which is a <namespace>:<name> key used to look up the primary resource object, Memcached, from the cache:
func (r *ReconcileMemcached) Reconcile(request reconcile.Request) (reconcile.Result, error) {
  // Lookup the Memcached instance for this reconcile request
  memcached := &cachev1alpha1.Memcached{}
  err := r.client.Get(context.TODO(), request.NamespacedName, memcached)
  ...
}
// Fetch the Memcached instance
// Check if the deployment already exists, if not create a new one
// Ensure the deployment size is the same as the spec
// Update the Memcached status with the pod names
// List the pods for this memcached's deployment
// Update status.Nodes if needed
// Reconcile successful - don't requeue
return reconcile.Result{}, nil
// Reconcile failed due to error - requeue
return reconcile.Result{}, err
// Requeue for any reason other than error
return reconcile.Result{Requeue: true}, nil
NOTE: See here the Kubernets Controller pkg spec.
Registering the CRD Operator in your cluster
It will add/create this type of object in the cluster. Remember that Operators are a type of resources. Before running the Operator, the CRD must be registered with the Kubernetes/OpenShift API server:
$ kubectl create \
    -f deploy/crds/cache_v1alpha1_memcached_crd.yaml
Once this is done, there are two ways to run the operator:
- As a Deployment inside a Kubernetes cluster: (In this post, we will adopt this option)
- In this option, you need to have an image which will be used to do the deploy
- As Go program outside a cluster
- It is used for development propose then publish the image in some repository is no longer required.
Creating the image repository
- Go to your docker hub account
- Create a new public repository with the name memcached-operator
- Configure the –insecure-registry in your local docker as follows
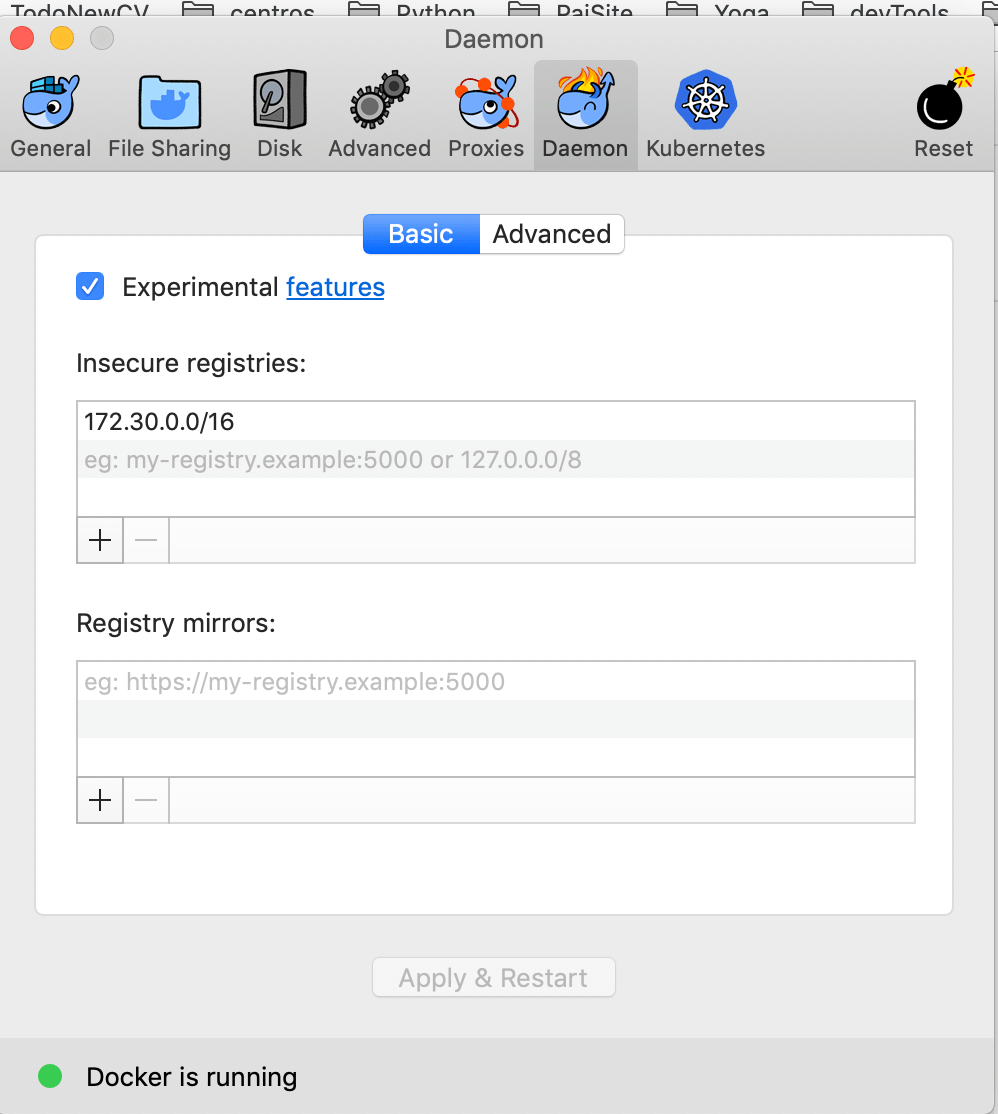
NOTE: See more about –insecure-registry configuration here
Building the image
- Build the memcached-operator image with the following command.
$ operator-sdk build <docker-image>:v0.0.1Following an example.
$ operator-sdk build cmacedo/memcached-operator:v0.0.1
NOTE: This command will build the the image.
$ cat build/Dockerfile
FROM registry.access.redhat.com/ubi7-dev-preview/ubi-minimal:7.6
ENV OPERATOR=/usr/local/bin/memcached-operator \
    USER_UID=1001 \
    USER_NAME=memcached-operator
# install operator binary
COPY build/_output/bin/memcached-operator ${OPERATOR}
COPY build/bin /usr/local/bin
RUN  /usr/local/bin/user_setup
ENTRYPOINT ["/usr/local/bin/entrypoint"]
USER ${USER_UID}
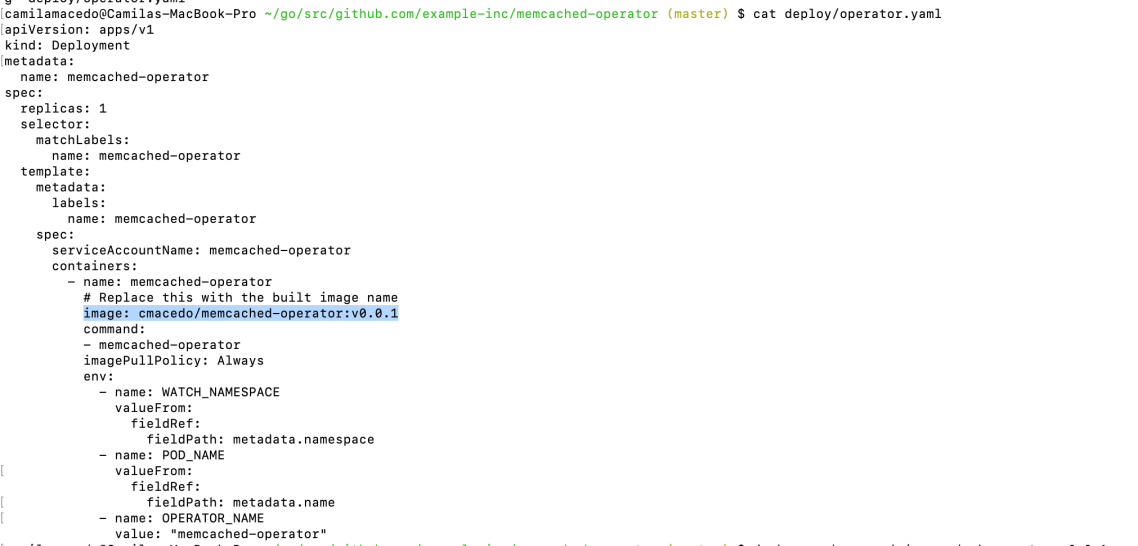
- The Deployment manifest is generated at
deploy/operator.yaml. Update the Deployment image as follows since the default is just a placeholder:
$ sed -i "" 's|REPLACE_IMAGE|<image>:<tag>|g' deploy/operator.yaml
Following the example.
$ sed -i "" 's|REPLACE_IMAGE|cmacedo/memcached-operator:v0.0.1|g' deploy/operator.yaml
NOTE: The above command is valid for MacOS. You can use the following in a linux SO.
$ sed -i 's|REPLACE_IMAGE|<image>:v0.0.1|g' deploy/operator.yaml
- See the deploy/operator.yaml file. The name of the image will be there.
Publishing the image
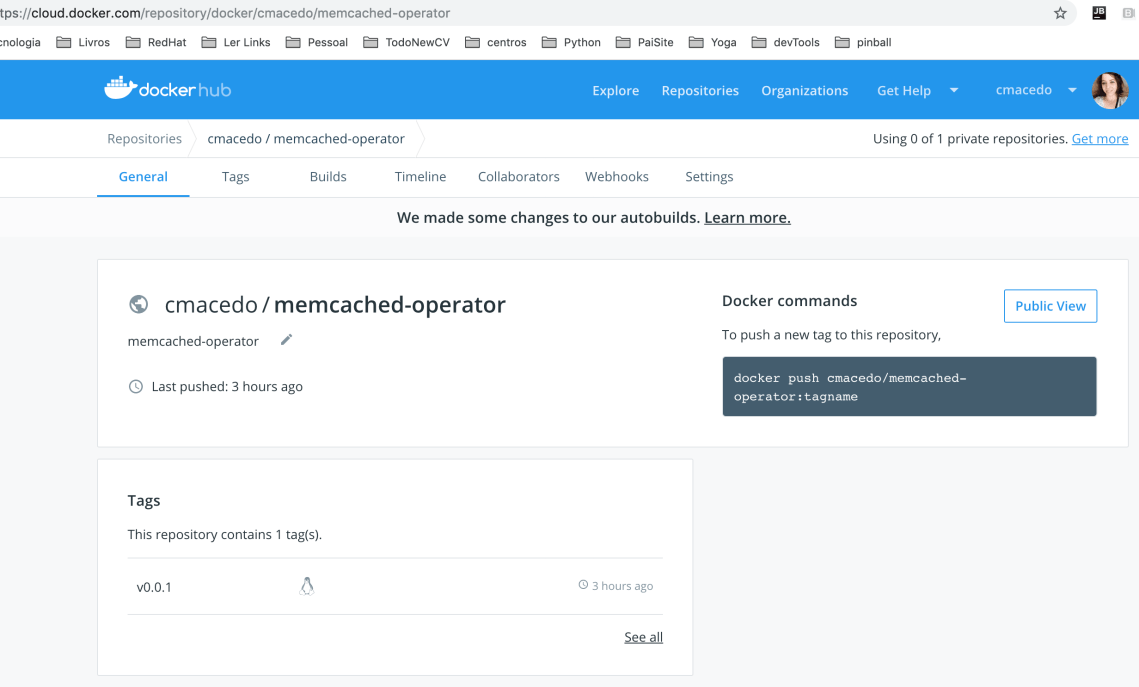
- Login via command line in your docker account by the command $ docker login
- Push your new image to your docker repository. Following the example.
$ docker push cmacedo/memcached-operator:v0.0.1
- Check your image published in your docker hub.
Deploying the operator in the Minishift
- Prior to deploying the operator controller, we need to create the service account and assign it a role with the proper permissions to manage resources:
# Setup RBAC
$ kubectl create -f deploy/role.yaml
$ kubectl create -f deploy/role_binding.yaml
# Setup Service Account
$ kubectl create -f deploy/service_account.yaml
NOTE: If the scope of your operater is cluster then it will be a little different as follows.
Using
--cluster-scopedwill scaffold the new operator with the following modifications:
deploy/operator.yaml– SetWATCH_NAMESPACE=""instead of setting it to the pod’s namespacedeploy/role.yaml– UseClusterRoleinstead ofRoledeploy/role_binding.yaml:
- Use
ClusterRoleBindinginstead ofRoleBinding- Set the subject namespace to
REPLACE_NAMESPACE. This must be changed to the namespace in which the operator is deployed.
- Then, we can deploy the operator controller:
# deploy operator
$ kubectl create -f deploy/operator.yaml
- Verify that
memcached-operatoris up and running:$ kubectl get deployment NAME DESIRED CURRENT UP-TO-DATE AVAILABLE AGE memcached-operator 1 1 1 1 1m
NOTE: You can also use the oc commands as for example “$ oc get pods“
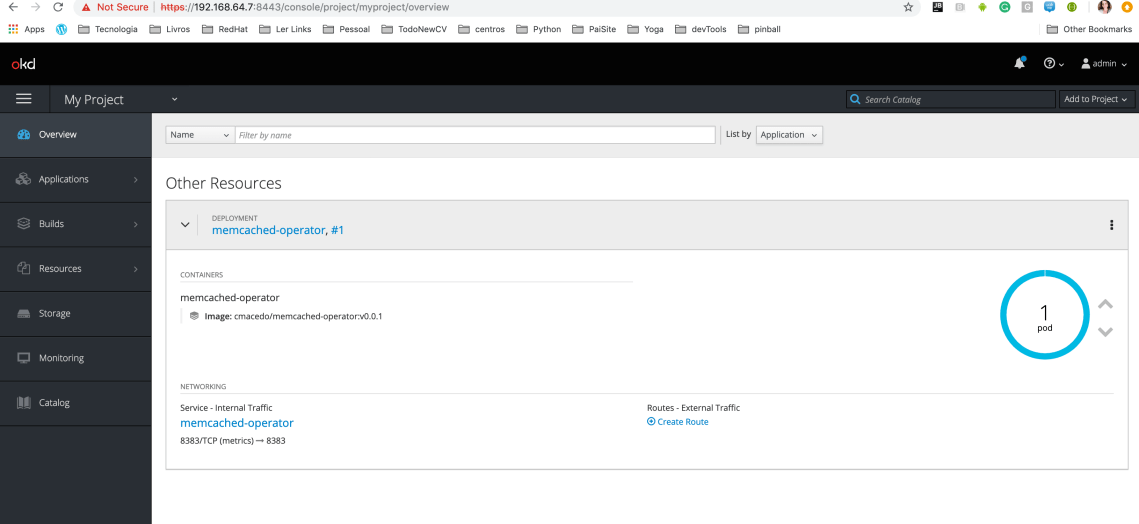
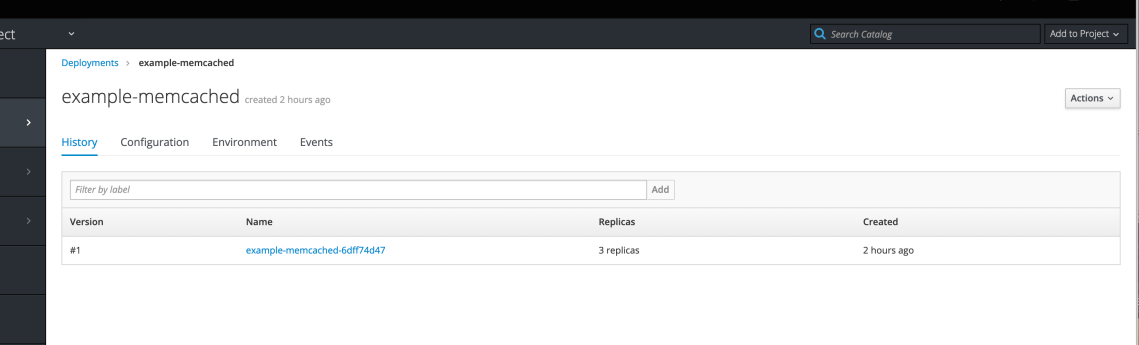
- Go to your Minishift/Openshift console and check the operator deployed.
Using the operator to deploy the Memcache
- Check the
MemcachedCR that was generated atdeploy/crds/cache_v1alpha1_memcached_cr.yaml:
$ cat deploy/crds/cache_v1alpha1_memcached_cr.yaml
apiVersion: "cache.example.com/v1alpha1"
kind: "Memcached"
metadata:
  name: "example-memcached"
spec:
  size: 3
- Deploy the Memcached CR as follows.
# Setup the CRD
$ kubectl apply -f deploy/crds/cache_v1alpha1_memcached_cr.yaml
- Check the deployments
$ kubectl get deployment
NAME                     DESIRED   CURRENT   UP-TO-DATE   AVAILABLE   AGE
memcached-operator       1         1         1            1           2m
example-memcached        3         3         3            3           1m
- Check the pods

- Check the deployments and pods in your MInishift/Openshift console.

Checking Memcache
After the CRD has been created and deployed, you can access it via the cluster API endpoint and command line tools. Following some utils command line and suggested checks.
# Get all CRDs deployed
$ oc get crd
# GET Memchaed CRD
$ oc get crd memcacheds.cache.example.com

# check the pods
$ oc get pods
# check if there's a CR using the CRD fullname...
$ oc get memcacheds.cache.example.com
# ... or one of its aliases
oc get memcacheds
Now, you can test its operator and check it by the following commands.
# Delete a pod
$ oc delete pod <pod-id>
# Check that a new pod will be created by the CRD
# See that a new pod was created to replace
# the one we just deleted
$ oc get pods -l app=<name>
NOTE: The same operations can be performed by Minishift/Openshift console.
Deleting Memcache Operator
The following command will delete the Operator and CRD deploy.
$ kubectl delete -f deploy/crds/cache_v1alpha1_memcached_cr.yaml
$ kubectl delete -f deploy/operator.yaml
# Full Cleanup
$ kubectl delete -f deploy/crds/app_v1alpha1_appservice_cr.yaml
$ kubectl delete -f deploy/operator.yaml
$ kubectl delete -f deploy/role.yaml
$ kubectl delete -f deploy/role_binding.yaml
$ kubectl delete -f deploy/service_account.yaml
$ kubectl delete -f deploy/crds/app_v1alpha1_appservice_crd.yaml
Some References and Utils Links
- An Example of one Operator with the application and the database installed/managed by it
- Operator Framework
- Operator Framework Getting Started
- Openshift Template Library
- Kubernetes API Conventions
- Library for embedding static files
- [OpenShift Doc] – Getting started with the Operator SDK
- Operator-SDK
- Operator SDK CLI reference
- Awesome Operators in the Wild – Examples
