

Docker creates automatically 3 networks as follows.
$ docker network ls
NETWORK ID NAME DRIVER SCOPE
9efac8172982 bridge bridge local
34f8b39ae485 host host local
23e44cc8fd8c none null local
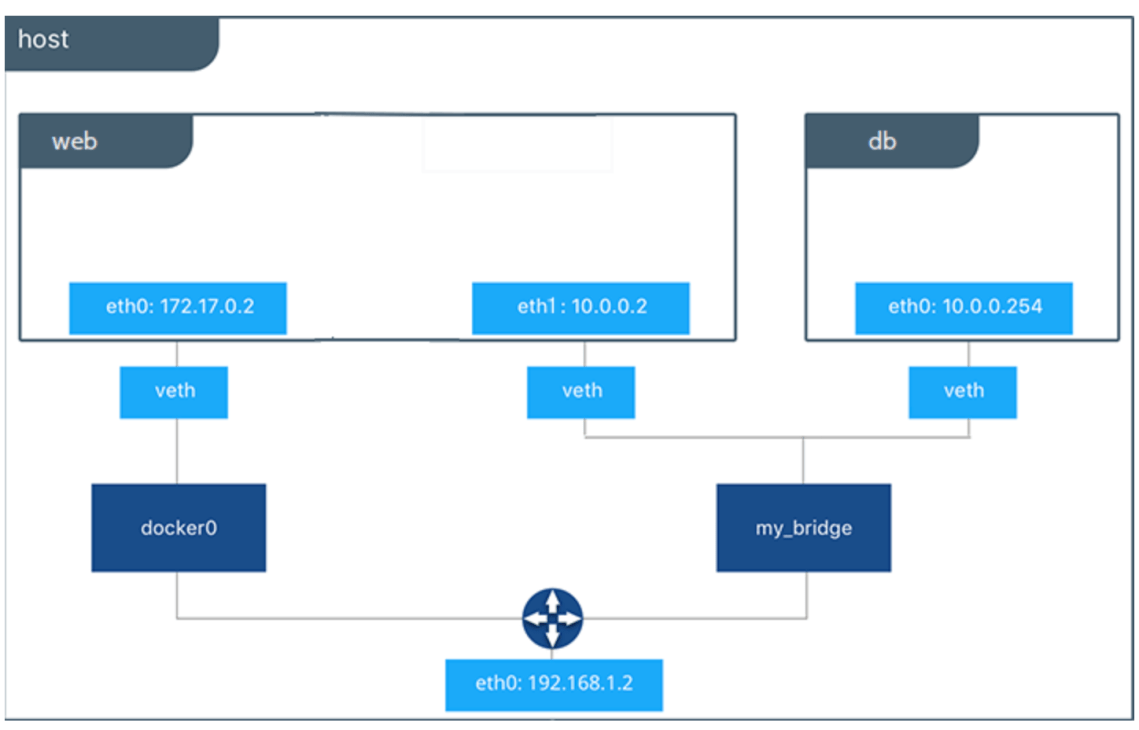
The bridge is the default network which is used when a container is created. Then, it means that by default the packets get routed between containers on the host via it (docker0).
Also, we are able to create new networks as the following example.
docker network create -d bridge my_bridgeAnd, then we are able to make our containers use our networks as the following example
docker run -d --net=my_bridge --name my_containerFollowing an image with an example to illustrate this idea.
How to find the Docker containers IP?
Use the command docker network inspect <network> to get this information.
Example:
$ docker network inspect bridge
[
    {
        "Name": "bridge",
        "Id": "9efac81729828cac8ac66f1f5842e4907af89da7bb716adca0b10068db0e99e3",
        "Created": "2019-10-18T00:45:06.391122672Z",
        "Scope": "local",
        "Driver": "bridge",
        "EnableIPv6": false,
        "IPAM": {
            "Driver": "default",
            "Options": null,
            "Config": [
                {
                    "Subnet": "172.17.0.0/16",
                    "Gateway": "172.17.0.1"
                }
            ]
        },
        "Internal": false,
        "Attachable": false,
        "Ingress": false,
        "ConfigFrom": {
            "Network": ""
        },
        "ConfigOnly": false,
        "Containers": {
            "0dfef3a16d0f0c99abef41085088d4bf3e492af7da1c6acdd5717bd35507831f": {
                "Name": "nginx",
                "EndpointID": "7c0a9a02ff8bfe573e799e05cc47da76085b9e9c2e10d09ecaac95d7c6a4cc8c",
                "MacAddress": "02:42:ac:11:00:03",
                "IPv4Address": "172.17.0.3/16",
                "IPv6Address": ""
            },
            "f69da87bec9f15e8db5de693ace3a0a11fb31768df869feeb3caaaee256dc939": {
                "Name": "my_container",
                "EndpointID": "f59b98043ced8808fccadc58e5eaf179285aca57545dc51ff83da2905d9886f9",
                "MacAddress": "02:42:ac:11:00:02",
                "IPv4Address": "172.17.0.2/16",
                "IPv6Address": ""
            }
        },
        "Options": {
            "com.docker.network.bridge.default_bridge": "true",
            "com.docker.network.bridge.enable_icc": "true",
            "com.docker.network.bridge.enable_ip_masquerade": "true",
            "com.docker.network.bridge.host_binding_ipv4": "0.0.0.0",
            "com.docker.network.bridge.name": "docker0",
            "com.docker.network.driver.mtu": "1500"
        },
        "Labels": {}
    }
]
See here the IP for my_container in this network for example. Then, by using it would be possible to ping the my_container from any other container inside of this network.
“f69da87bec9f15e8db5de693ace3a0a11fb31768df869feeb3caaaee256dc939”: {
“Name”: “my_container”,
“EndpointID”: “f59b98043ced8808fccadc58e5eaf179285aca57545dc51ff83da2905d9886f9”,
“MacAddress”: “02:42:ac:11:00:02”,
“IPv4Address”: “172.17.0.2/16”,
“IPv6Address”: “”
}
NOTE: For a further understanding check the Docker docs.
Following some exercises which can help you learn more about it.
- Docker Networks: https://www.katacoda.com/courses/docker/networking-intro
- Communicating Between Containers: https://www.katacoda.com/courses/docker/5
Also, please feel free to check the tag docker of this website to see all related blog posts.
Sponsored by:
![]()
![]()
