


The goal of this post is to help you to know how to develop Golang Operators using Operator Framework as faster as possible. We are assuming here that you are entirely new in all stack to achieve it.
This post will try help you Getting Start with Go operators from the scratch based in the latest updates in the SDK tool and its 1.0 release.
1. Kubernetes
The first step is to understand the basic Kubernetes concepts and have it installed and configured in your development environment. So, follow up the blog post How to getting started with Kubernetes?
2. Getting Started with Go Operators
By using operators, it’s possible not only to provide all expected resources but also to manage them dynamically, programmatically, and at execution time. To illustrate this idea, imagine if someone accidentally changed a configuration or removed a resource by mistake; in this case, the operator could fix it without any human intervention. Before following the next steps ensure that you have the Operator-SDK tool with a version >= 1.0 installed locally. To install check its guide.
We will create a sample project to let you know how it works and this sample will:
- Reconcile a Memcached CR
- Create a Deployment with the Memcached image
- Not allow has more instances than the size defined in the c CR which will be applied
- Update the Memcached CR status with a List of the Pod Names created with the Memcached image
Following the steps.
Create a project
Create and change into a directory for your project. Then call operator-sdk init:
mkdir $GOPATH/memcached-operator
cd mkdir $GOPATHmemcached-operator
operator-sdk init --domain=example.com
Create a simple Memcached API:
operator-sdk create api --group cache --version v1 --kind Memcached --resource=true --controller=true
Understanding API’s
The goal of this command is to create Custom Resource (CR) and Custom Resource Definition (CRD) resources for the Memcached Kind. This command is creating the API with the group cache.example.com, and version v1alpha1 which uniquely identifies the new CRD of the Memcached Kind.
Consequently, by using the Operator SDK tool, we can create our APIs and objects that will represent our solutions on these platforms. Here will adds only a single kind of resource; however, it could have as many Kinds as needed (1…N). Basically, the CRDs are a definition of our customized Objects, and the CRs are an instance of it.
Getting a better idea
Let’s think about the classic scenario where the goal is to have an application and its database running on the platform with Kubernetes. Then, one object could represent the App, and another one could represent the DB. By having one CRD to describe the App and another one for the DB, we will not be hurting concepts such as encapsulation, the single responsibility principle, and cohesion. Damaging these concepts could cause unexpected side effects, such as difficulty in extending, reuse, or maintenance, just to mention a few.
In conclusion, the App CRD will have as its controller the DB CRD. Imagine, that a Deployment and Service are required for the application run so that the App’s Controller will provide these resources in this example. Similarly, the DB’s controller will have the business logic implementation of its objects.
In this way, for each CRD, one controller should be produced according to the design set by the controller-runtime.
Define your API
In this example, we will define that the Memcached Kind (CRD) will have the attribute size which will specify the quantity of Memcached instances will be deployed. Also, we will create an attribute to its Status which will store the Pod Names. Note that, the status field here is just to illustrate the idea but for it would be recommended use Conditionals instead of that.
Update the api/v1alpha1/memcached_types.go file:
// MemcachedSpec defines the desired state of Memcached
type MemcachedSpec struct {
	// +kubebuilder:validation:Minimum=0
	// Size is the size of the memcached deployment
	Size int32 `json:"size"`
}

// MemcachedStatus defines the observed state of Memcached
type MemcachedStatus struct {
	// Nodes are the names of the memcached pods
	Nodes []string `json:"nodes"`
}
Now, run the following command to generate CRD in config/crd/bases and the CR in the config/samples with these definitions:
make manifests
**NOTE**: The above makefile target will invoke the controller-gen. This project generates the manifests and update the GO code as well. See the file `api/v1/zz_generated.deepcopy.go`.
The following Marker used in the example will generate validation schemas for your CRD.
// +kubebuilder:validation:Minimum=0
See the validation schema in the CRD (it will make the k8s API validate the its CR’s applied):
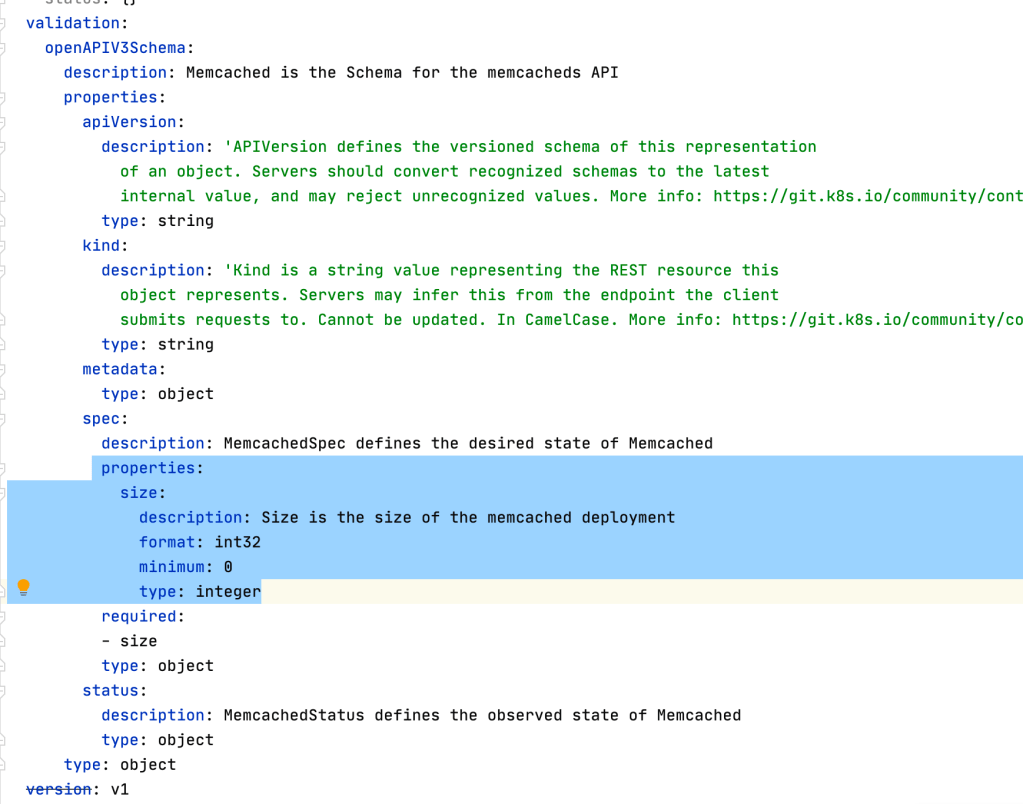
Now, update the CR sample in `config/samples/cache_v1_memcached.yaml` to set the attribute defined:
apiVersion: cache.example.com/v1
kind: Memcached
metadata:
  name: memcached-sample
spec:
  # Add fields here
  size: 1
Controller main functions
Reconcile()
The reconcile function is responsible for synchronizing the resources and their specifications according to the business logic implemented on them. In this way, it works like a loop, and it does not stop until all conditionals match its implementation. The following is pseudo-code with an example that clarifies it.
reconcile App {

   // Check if a Deployment for the app exists, if not create one
   // If has an error, then go to the beginning of the reconcile
   if err != nil {
       return reconcile.Result{}, err
   }

   // Check if a Service for the app exists, if not create one
   // If has an error, then go to the beginning of the reconcile
   if err != nil {
       return reconcile.Result{}, err
   }

   // Looking for Database CR/CRD
   // Check the Database Deployments Replicas size
   // If deployment.replicas size != cr.size, then update it
   // Then, go to the beginning of the reconcile
   if err != nil {
       return reconcile.Result{Requeue: true}, nil
   }
   ...

   // If it is at the end of the loop, then:
   // All was done successfully and the reconcile can stop
   return reconcile.Result{}, nil

}
The following are a few possible return options to restart the Reconcile:
- With the error:
return ctrl.Result{}, err
- Without an error:
return ctrl.Result{Requeue: true}, nil
- Therefore, to stop the Reconcile, use:
return ctrl.Result{}, nil
- Reconcile again after X time:
return ctrl.Result{RequeueAfter: nextRun.Sub(r.Now())}, nil
Note: For more details, check the Reconcile and its Result godoc.
Check the controllers/memcached_controller.go and see that the reconcile has a comment `// your logic here` where this logic will be set. Replace it with:
ctx := context.Background()
	log := r.Log.WithValues("memcached", req.NamespacedName)

	// Fetch the Memcached instance
	memcached := &cachev1.Memcached{}
	err := r.Get(ctx, req.NamespacedName, memcached)
	if err != nil {
		if errors.IsNotFound(err) {
			// Request object not found, could have been deleted after reconcile request.
			// Owned objects are automatically garbage collected. For additional cleanup logic use finalizers.
			// Return and don't requeue
			log.Info("Memcached resource not found. Ignoring since object must be deleted")
			return ctrl.Result{}, nil
		}
		// Error reading the object - requeue the request.
		log.Error(err, "Failed to get Memcached")
		return ctrl.Result{}, err
	}

	// Check if the deployment already exists, if not create a new one
	found := &appsv1.Deployment{}
	err = r.Get(ctx, types.NamespacedName{Name: memcached.Name, Namespace: memcached.Namespace}, found)
	if err != nil && errors.IsNotFound(err) {
		// Define a new deployment
		dep := r.deploymentForMemcached(memcached)
		log.Info("Creating a new Deployment", "Deployment.Namespace", dep.Namespace, "Deployment.Name", dep.Name)
		err = r.Create(ctx, dep)
		if err != nil {
			log.Error(err, "Failed to create new Deployment", "Deployment.Namespace", dep.Namespace, "Deployment.Name", dep.Name)
			return ctrl.Result{}, err
		}
		// Deployment created successfully - return and requeue
		return ctrl.Result{Requeue: true}, nil
	} else if err != nil {
		log.Error(err, "Failed to get Deployment")
		return ctrl.Result{}, err
	}

	// Ensure the deployment size is the same as the spec
	size := memcached.Spec.Size
	if *found.Spec.Replicas != size {
		found.Spec.Replicas = &size
		err = r.Update(ctx, found)
		if err != nil {
			log.Error(err, "Failed to update Deployment", "Deployment.Namespace", found.Namespace, "Deployment.Name", found.Name)
			return ctrl.Result{}, err
		}
		// Spec updated - return and requeue
		return ctrl.Result{Requeue: true}, nil
	}

	// Update the Memcached status with the pod names
	// List the pods for this memcached's deployment
	podList := &corev1.PodList{}
	listOpts := []client.ListOption{
		client.InNamespace(memcached.Namespace),
		client.MatchingLabels(labelsForMemcached(memcached.Name)),
	}
	if err = r.List(ctx, podList, listOpts...); err != nil {
		log.Error(err, "Failed to list pods", "Memcached.Namespace", memcached.Namespace, "Memcached.Name", memcached.Name)
		return ctrl.Result{}, err
	}
	podNames := getPodNames(podList.Items)

	// Update status.Nodes if needed
	if !reflect.DeepEqual(podNames, memcached.Status.Nodes) {
		memcached.Status.Nodes = podNames
		err := r.Status().Update(ctx, memcached)
		if err != nil {
			log.Error(err, "Failed to update Memcached status")
			return ctrl.Result{}, err
		}
	}

	return ctrl.Result{}, nil
Now, add a new function which is called above and will create the Memcached Deployment:
// deploymentForMemcached returns a memcached Deployment object
func (r *MemcachedReconciler) deploymentForMemcached(m *cachev1.Memcached) *appsv1.Deployment {
	ls := labelsForMemcached(m.Name)
	replicas := m.Spec.Size

	dep := &appsv1.Deployment{
		ObjectMeta: metav1.ObjectMeta{
			Name:      m.Name,
			Namespace: m.Namespace,
		},
		Spec: appsv1.DeploymentSpec{
			Replicas: &replicas,
			Selector: &metav1.LabelSelector{
				MatchLabels: ls,
			},
			Template: corev1.PodTemplateSpec{
				ObjectMeta: metav1.ObjectMeta{
					Labels: ls,
				},
				Spec: corev1.PodSpec{
					Containers: []corev1.Container{{
						Image:   "memcached:1.4.36-alpine",
						Name:    "memcached",
						Command: []string{"memcached", "-m=64", "-o", "modern", "-v"},
						Ports: []corev1.ContainerPort{{
							ContainerPort: 11211,
							Name:          "memcached",
						}},
					}},
				},
			},
		},
	}
	// Set Memcached instance as the owner and controller
	ctrl.SetControllerReference(m, dep, r.Scheme)
	return dep
}
Also, adds the helper to creta the labels:
// labelsForMemcached returns the labels for selecting the resources
// belonging to the given memcached CR name.
func labelsForMemcached(name string) map[string]string {
	return map[string]string{"app": "memcached", "memcached_cr": name}
}
And the function which will get the Memcached Pod Names for we update its CR status:
// getPodNames returns the pod names of the array of pods passed in
func getPodNames(pods []corev1.Pod) []string {
	var podNames []string
	for _, pod := range pods {
		podNames = append(podNames, pod.Name)
	}
	return podNames
}
Setting the RBAC permissions
The RBAC permissions are now configured via RBAC markers, which are used to generate and update the manifest files present in config/rbac/. These markers can be found (and should be defined) on the Reconcile() method of each controller.
In the Memcached example, they look like the following:
// +kubebuilder:rbac:groups=cache.example.com,resources=memcacheds,verbs=get;list;watch;create;update;patch;delete
// +kubebuilder:rbac:groups=cache.example.com,resources=memcacheds/status,verbs=get;update;patch
// +kubebuilder:rbac:groups=apps,resources=deployments,verbs=get;list;watch;create;update;patch;delete
// +kubebuilder:rbac:groups=core,resources=pods,verbs=get;list
Run again `make manafests` to update the rbac files with the permissions added above.
Watches()
The watches are responsible for ”watching/observe” the objects and triggering the Reconcile. See an example for the Memcached objects:
// Watch for changes to primary resource Memcached
err = c.Watch(&source.Kind{Type: &cachev1alpha1.Memcached{}}, &handler.EnqueueRequestForObject{})
if err != nil {
    return err
}
We also could create watches for other resources such as:
// Watch for changes to secondary resource Pods and requeue the owner Memcached

err = c.Watch(&source.Kind{Type: &appsv1.Deployment{}}, &handler.EnqueueRequestForOwner{
    IsController: true,
    OwnerType:    &cachev1alpha1.Memcached{},
})
if err != nil {
    return err
}

err = c.Watch(&source.Kind{Type: &corev1.Service{}}, &handler.EnqueueRequestForOwner{
    IsController: true,
    OwnerType:    &cachev1alpha1.Memcached{},
})
if err != nil {
    return err
}
The watches are defined in the function `SetupWithManager` that you can find in the controller.go. In our example, we will setting up controller Watches in a simplified way which has controller Builder:
func (r *MemcachedReconciler) SetupWithManager(mgr ctrl.Manager) error {
	return ctrl.NewControllerManagedBy(mgr).
		For(&cachev1alpha1.Memcached{}).
		Owns(&appsv1.Deployment{}).
		Complete(r)
}
Now, ensure that your mencached_controller.go will be such as the example: https://github.com/dev4devs-com/memcached-operator/blob/master/controllers/memcached_controller.go
Manager (main.go)
The Manager is responsible for managing Controllers and, then by the controllers, we can do operations on the cluster side. If you look in the main.go file you will see:
...
mgr, err := ctrl.NewManager(ctrl.GetConfigOrDie(), ctrl.Options{
    Scheme:             scheme,
    MetricsBindAddress: metricsAddr,
    Port:               9443,
    LeaderElection:     enableLeaderElection,
    LeaderElectionID:   "f1c5ece8.example.com",
})
...
The above code define the Manager options. In this example, we will not change it. However, it is important you know where it is defined and that your operator based image will be initialized by this code. The manager is responsable to manage the controllers generated for your operators APIs. See:
setupLog.Info("starting manager")
	if err := mgr.Start(ctrl.SetupSignalHandler()); err != nil {
		setupLog.Error(err, "problem running manager")
		os.Exit(1)
	}
Checking the Project running in the cluster
Configuring your test environment (Mandatory)
Update your test Makefile target to the following: (otherwise you will be unable to build the project)
# Run tests
ENVTEST_ASSETS_DIR=$(shell pwd)/testbin
test: generate fmt vet manifests
	mkdir -p ${ENVTEST_ASSETS_DIR}
	test -f ${ENVTEST_ASSETS_DIR}/setup-envtest.sh || curl -sSLo ${ENVTEST_ASSETS_DIR}/setup-envtest.sh https://raw.githubusercontent.com/kubernetes-sigs/controller-runtime/master/hack/setup-envtest.sh
	source ${ENVTEST_ASSETS_DIR}/setup-envtest.sh; fetch_envtest_tools $(ENVTEST_ASSETS_DIR); setup_envtest_env $(ENVTEST_ASSETS_DIR); go test ./... -coverprofile cover.out
Building and pushing the operator image
Use the built-in Makefile targets to build and push your operator. Make sure to define IMG when you call make:
make docker-build docker-push IMG=<some-registry>/<project-name>:<tag>
NOTE: To allow the cluster pull the image the repository needs to be set as public or you must configure an image pull secret. E.g `make docker-build docker-push IMG=quay.io/dev4devs-com/memcached-operator:0.0.1` see its image in https://quay.io/repository/dev4devs-com/memcached-operator?tab=logs.
Running the operator
Install the CRD and deploy the project to the cluster. Set IMG with make deploy to use the image you just pushed:
make install
make deploy IMG=<some-registry>/<project-name>:<tag>
- Apply the CR to check the Memcached in the cluster:
kubectl apply -f config/samples/cache_v1_memcached.yaml -n memcached-operator-system
- Verify that CR was reconciled by the operator:
kubectl logs deployment.apps/memcached-operator-controller-manager -n memcached-operator-system
- Check your operator and memcached resources created:
kubectl get all -n memcached-operator-system
- Now, you can cleanup all by running to delete the CR:
kubectl delete -f config/samples/cache_v1_memcached.yaml
- And to uninstall all operator’s resources and its CRDs:
kustomize build config/default | kubectl delete -f -
Example Source:
Feel free to check this example in : https://github.com/dev4devs-com/memcached-operator
3. Distributing your solution with OLM
Now, that we check how to create an operator see that you can promote your solutions via the https://operatorhub.io/ and the OpenShift Catalogue. Also, you could do the same privately as well.
See that your Makefile you will find targets which will help you to generated the bundle and the required manifests to integrate your project with OLM and then, in this way, be able to promote and publish this solution as described above. For more information check the OLM integration menu in the SDK docs as the steps in the OperatorHub.io to contribute with this catalogue.

1 Comment